2014年9月28日星期日

DIY handmade cloth decorative flower

These bunches of flowers beautifully decorated it? Share DIY handmade flowers this tutorial to everyone. For everyone to learn, prepared to be decorated when can come in handy. First prepare some of their favorite fabrics monochrome color can be. Tools are needed to prepare a cup, hot melt adhesive, sewing scissors and a small bamboo stick and so on

diy handmade

First cup printed on cloth, pen strokes along the cup, draw a circle. A flower ball probably used eight round fabric, if less then increases. And then use scissors to build down, the radius of each circle cloth butt butt again.
 diy handmade
After docking spend needle through, and then re-docked on a cloth and then step on a string.
 diy handmade
After a good string, probably forming, and you can receive the needle knot, and then to take the ball a little more like a spherical shape sorting, the final step is to glue the bottom of the flower ball on a hot melt adhesive paste to the bamboo stick.
 diy handmade
Used as decoration on the cake is very suitable, simple production industry, nice totally better than store-bought, your friend might like to try.
Read more:http://www.turehearted.com/news/news140.html

2014年9月27日星期六

Truehearted the latest Certification

paint by number

paint by number

paint by number

Product quality is the fundamental survival of an enterprise, there is no good quality, unable to keep customers, clients do not want any disposable products to his customers. Truehearted the development of enterprises, has always emphasized quality of the product, the following checks on the quality of product certification bodies can provide a reference. SGS, trademark certificates, Alibaba Assessed Supplier.
Read more:http://www.turehearted.com/news/news139.html

DIY origami flower bouquet

DIY origami DIY origami

DIY origami

DIY origami


Today is share with diy origami flower bouquet
Who likes can refer reference.
The effect of making up less than really beautiful flowers.

First, a width of 1cm to trim the paper strip
Then follow the map folding to fold
First step by step on a triangular fold on fold

Then fold out about a right angle to the direction
Began to roll out a small bud

The final step is always to roll out around the petals of the flower buds
The method in accordance with the act on the map roll, roll fold to about the size you can paste a good ending.

Read more:http://www.turehearted.com/news/news138.html

2014年9月26日星期五

Truehearted Paint by Number Superiority

paint by numbe

Truehearted paint by number superiority
 
Pigment
We are promise 2 years won't be dry out, the industry only half years.
 
Colors
Our product color rigorous selection process,bright beautiful. the industry serious color, color dim.
 
Canvas
We use high quality 100% pure cotton canvas, draw smooth durable; the industry less inferior material, rough canvas
 
Line
our designer seriously every detail, clear lines; the other lines disorder, lines appear knotted

Read more:http://www.turehearted.com/news/news137.html

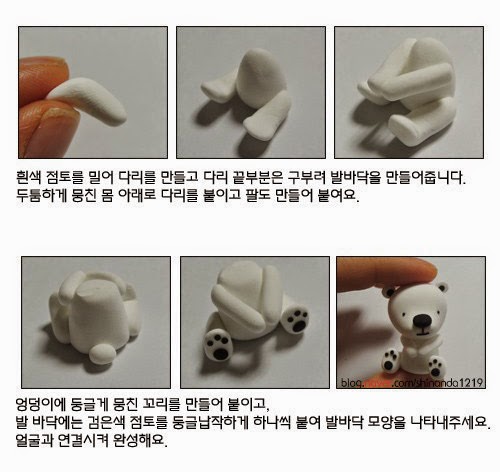
Diy handmade clay white bear

To share with us diy handmade clay white bear tutorial is very simple, for lack of patience, beginners and children, or hands-on production. Although modeling is not difficult, but also are big lines on the structure. However, the final effect is still good, very cute.
Black and white clay Fimo on it. May be slightly more complicated still head and feet, the body is a few cylinders of. However, it is relative, and you yourself know the figure, the head is actually very simple. It is easy to make shape, not to say, and quickly hands-on production
Read more:http://www.turehearted.com/news/news136.html
diy handmade

diy handmade

2014年9月25日星期四

Seven spurposes by paint by number

Turehearted diy paint by number process in addition to enjoying the fun, what function? Does anyone really understand the function of paint by number? DIY paint by number features 7 extraordinary world.

paint by number


1 paint by number aesthetic features:

Turehearted all paint by number pattern from world famous paintings, oil paintings by number designers have carefully re-creation, while maintaining the original style based Uehara painting "translated" into a number canvas, and strive to make all the colorful painted paint by number users who feel the charm of the essence of the original painting. As if the painting masters together to create paintings. In the process of painting, you can feel the pain and joy, sweat and passion of artistic creation. Each picture can say a deeper understanding of the work of one level, the pursuit of beauty and everyone can!

2 paint by number of interactive features:
READ MORE:http://www.turehearted.com/news/news135.html

Lovely Fimo clay by handmade

handmade

handmade

Today's handmade Fimo clay to give us a very cute baby, and this little doll, but quite immature, pacifier in his mouth, still image of the Department of the bib and diapers, but the real deal infant. Looked on very lovable people love and affection. Like cute and has a pure heart, how can you resist, and quickly picked up a handmade clay.
Handmade material: color, brown, lake blue, green, orange, red, pink, white clay and clay common authoring tools suite.
Because the whole process is quite delicate, and also a lot of parts. Therefore, we should point the nature of resistance to the hands-on production slowly. Can not be impatient with the baby's not a easy thing, wrong, is not easy to be a baby.
READ MORE:http://www.turehearted.com/news/news134.html

2014年9月24日星期三

Painting by number home decoration

Painting by number is the new darling of home furnishings, not only can be placed in the kitchen, den, also can be placed in the back of the sofa in the living room, the TV on the wall after the bedroom. However, how to make painting by number Mimi put a gesture in the room it? In this proposal: if the room is large, symmetrical paintings may take the form; If the room is small, then take the asymmetric form; considering the spatial aspects, attention should retain a sense of the wall blank, do not hang too much, but also extended attention drawn lines and space lines, echoing and complementary. Of course we go deeper, placed is a relatively advanced technology. How to make the display more interesting painting by number and a sense of coordination it? Consider the following tips.
painting by number

Tip 1: The first placement is the best place to sight
The first placement into the house of the discharge line of sight is the most decorative painting place, so you will not feel at home on the wall is empty, the sight is not good, but also produce freshness.
Read more here:http://www.turehearted.com/news/news132.html

Diy hand Fimo clay snail

Today's diy hand is a small snail Fimo clay tutorials, small snails are cute, especially the face, a little lovely feeling very likable.
Diy hand materials: blue, beige, gray, black, white, red, colored clay. Also need two small pieces of wire, used to jack up the snail big eyes.
This cute little snail body part has three large pieces, soft body, blue snail shells, and a pair of big eyes. Specific production but it is still very simple, no matter which part of the structure are not too complicated, so I quickly hands-on production.
Read more:http://www.turehearted.com/news/news133.html
diy hand


Diy handmade Fimo clay goldfish

To share diy handmade Fimo clay ​​goldfish, materials: mainly Fimo clay in several colors, white, red, green, black. In addition to making your habits clay tools also need a wire used to make tree branches grass part, have a certain hardness ah, otherwise it is easy to bend, a long time off easily deformed or broken. Pictures also more detailed tutorial, we looked at the picture started.
Read more:http://www.turehearted.com/news/news131.html
diy craft

diy craft

Transformation of discarded plastic bottles

Today's diy craft sharing to transform discarded plastic bottles, plastic bottles using environmentally friendly use, is to make plastic bottles into some kegs, used to hold pens, toothbrushes, tampons what we needed.
Diy craft very simple, first you need to find some of your favorite color and shape of the bottle, then just take a while at the bottom, as to how much should be set according to the shape of the bottle, the shape must be preserved beauty. Then that is the essence of this diy craft, you can use an iron to smooth the cut last very critical step, after the bottle treatment will be more smooth and natural, looks like bought the same.
Read more:http://www.turehearted.com/news/news130.html
diy craft

2014年9月22日星期一

Magical luminous paint by number

Many people are curious as to why there is luminous paint by number it? Can be achieved if the luminous effect? In fact, luminous paint by number is not very magical presence, many have luminous products, but luminous original paint by number is a product of our company, other manufacturers can not produced it, the unique look is magical.
Let's enjoy the luminous paint by number day and night effects, is not it beautiful?
Read more:http://www.turehearted.com/news/news129.html
paint by number

paint by number

paint by number

Diy craft heart-shaped origami bookmark

Today is share a diy craft origami tutorial diy craft heart-shaped origami bookmark, small memories in there such as: snowman bookmarks, bookmark monster mouth, heart-shaped bookmark also has a good several of . Today, this is a bookmark in a book in the corner of a triangular-shaped condom intentions to live as a form of bookmarks. Practical and beautiful, very suitable for girls love reading.
A square piece of paper can be made ​​to complete all of the recommended best choice with colored paper, so it's effect will be better. If jams color shiny hard points, then it is better to use, and not easily deformed and longer able to save some of them, the beautiful naturally impress. Well here it clean hands, either to yourself or to your beloved make him make a good choice.
Read more:http://www.turehearted.com/news/news128.html
diy craft

2014年9月16日星期二

The History Of Paint By Numbers

Many mock paint by number paintings, saying it’s-not-art-it’s-conformism. “This,” they say, “is not art.” It’s kitsch at its worst, and at its best it’s a hobby. We collectors disagree. Maybe it’s just ‘cuz we love our paint by number paintings; but maybe it’s because we know things that you mockers don’t.
Today, we begin with the history.


The Palmer Paint Company (Detroit, Michigan) introduced the first paint-by-number kits at the New York Toy Show in 1951, creating Craft Master as its premium line of PBN.
Some might say, “And the rest is history”. But I’m not that short-winded; nor was the story so neat and tidy as to stay within the lines.
The story begins in 1949 when Dan Robbins was working as a package designer for Max Klein at Palmer Paint Company in Detroit, Michigan. Robbins, inspired by childhood memories of coloring & painting, as well as the story of how Michelangelo assigned pre-numbered sections of his famous ceiling to his students to paint, pitches the idea for paintings created by applying paint to color-coded canvases to his boss. Klein resists at first, but eventually he gives the idea a try.
Read more:(so interesting)http://www.turehearted.com/news/news127.html

Diy handmade ribbon bracelet

Today is shared diy handmade bracelet weaving, knitting like a friend would be like, but today's style national wind, absolute fashion explosion models. And materials and weaving process is very simple, so simple can have a such a beautiful bracelet is great.
Diy handmade material: You need two long strips of woven belt, can be ribbon, ribbons, cloth belt, lace belt, etc., texture color what everyone feels their preferences can also be installed on the picture to. With the ribbon you need a metal bracelet, woven together into strengthening the texture effect. Also need a finished metal fasteners, or can be directly tied with a ribbon.
Weaving method, it is actually the easiest two shares of rope weaving method, cross-like, mixed in a metal rope belt edge like.
Read more:http://www.turehearted.com/news/news126.html
diy handmade

2014年9月15日星期一

Diy craft heart-shaped envelope origami tutorial

Today diy craft is the second time sharing, a very similar heart-shaped envelope origami, folding out a heart-shaped pattern envelope, so you can make your expression of love is more full-bodied . Easily write a few lines of love warm love letter, think very touching.
Note that the paper selection advice is both sides of a different color or pattern, so that will be effective out of the heart-shaped, or not easily seen, the material need only a piece of paper.
Read more:http://www.turehearted.com/news/news125.html
diy craft

Diy handmade Chinchilla Pencil bag

Diy handmade share is diy handmade Chinchilla Pencil bag that this manual is divided into two parts, one is a pencil case is decorated small Totoro doll. Whether it is the part can exist independently, we can together or independently produced.
Diy handmade material: non-woven, needle and thread, zippers, glue, scissors
The production, chinchillas styling has been given a graphical version of the type and the decomposition process, and also the main bulk of chinchillas. So chinchillas production will be a key part. Part Pencil relatively simple. Two pieces of cloth sewn together plus zipper on it. And then paste them together on it.
Read more:http://www.turehearted.com/news/news124.html

diy craft

2014年9月14日星期日

Painting by Number Helpful Approach for Beginners

Painting by Numbers is a system where a picture is divided into shapes, each marked with a number that corresponds to a particular color. You paint in each shape and ultimately the picture emerges as a finished painting.


The painting by numbers approach is often ridiculed as being simplistic, uncreative, and formulaic. I believe it's helpful in getting across the concept that a painting is built up through multiple shapes of color. These shapes often don't make sense individually, nor look like anything "real", but put together as a group they create the image.

The next step in developing as a painter is to learn to see such color shapes for yourself, without the aid of a printed diagram. Completing a painting by numbers project helps you learn to analyze a subject and observe areas of color. It helps you move away from focusing on what the finished subject will look like to looking as small areas and what color these should be painted.
Read more:http://www.turehearted.com/

2014年9月12日星期五

Diy craft paper filigree(Quilling)

Although the name is not well known, the technique of Quilling has been disseminated. This art arouses curiosity in people by their perfection and most, when he learns that it is made ​​with paper, just do not believe. It is interesting that this art! The Quilling is a craft technique that uses strips of curled paper. It is believed that this technique began in the fifteenth century and was widely used by French and Italian nuns from convents to decorate religious objects. They withdrew the golden edges of the bibles to do the job. It is speculated that in the eighteenth century, the technique became popular in England, when he received the name of Quilling, due to the fact that the rolls are made ​​with feathers of geese.
Diy craft
The Quilling are strips of paper rolls of different shapes that when arranged molded form various designs. With simple wooden stick, white glue and strips of paper, you can make true works of art. Note that the image shown above is a step by step technique. One need not be an expert to develop the work, just have patience and gentleness in his hands to give the format of the drawing rolls to be created. Note that the drawings were created and applied in scented soaps to be given as a souvenir. Incidentally, a different and good gift choice!
READ MORE : Diy craft paper filigree(Quilling)
http://www.turehearted.com/news/news122.html

10 Acrylic Paint Tips for Beginners

Acrylic paint are extremely versatile, fast-drying paints, and can be used paint by number or thinned with water or a medium and used like watercolors. And a lot in-between. Here are a few tips to help you get started painting with acrylic paint.

Acrylic Paint


Tip 1: Keeping Acrylic Paints Workable
Because acrylics dry so fast, squeeze only a little paint out of a tube at a time. If you're using a 'normal' plastic palette invest in a spray bottle so you can spray a fine mist over the paint regularly to keep it moist, and thus usable. 'Stay-wet' palettes – where the paint sits on a sheet of wax paper place on top of a damp piece of watercolor paper – eliminate the need to do this, but generally don't have a hole for your thumb so are more awkward to hold in your hand.

Tip 2: Blot your Brushes
Keep a piece of paper towel or cloth next to your water jar and get into the habit of wiping your brushes on it every time you rise them. This prevents water drops running down the ferrule and onto your painting, making blotches.
 Acrylic Paint
Tip 3: Opaque or Transparent Colors
If applied thickly – either straight from the tube or with very little water added – or if mixed with a little titanium white, all acrylic colors can be opaque. If diluted, they can be used like watercolors or for airbrushing.
READ MORE ABOUT:  10 Acrylic Paint Tips for Beginners(http://www.turehearted.com/news/news121.html)

2014年9月11日星期四

How to Embroidery Point Step by Step

Embroidery

This is a very special technique of embroidery. The ancient Egyptians were among the first to employ the technique using hollow wing bones of birds like needles. The technique was used throughout Europe during the middle ages, to decorate clothes and often in ecclesiastical panels.
For the development of own work is needed to needle point hoop (have two parts that fits each other), special line for point, white linen fabric, scissors, pen and the risk (drawing). With all these materials together you can already start it.
With the aid of a pen trace risk (drawing) for flax. Make the full risk. To facilitate, start drawing the center to the edges.
Stretch the fabric in the hoop and centralizing the design on lower rim of the timber.Once the fabric is taut and centralized add greater hoop adjusting it.
Cut about two feet of line at a time. Choose colors that you like more and more become harmonious to work. Start at the center of the embroidery (drawing).
As for putting a point near the other, the reverse will be well. Once you finish a piece of embroidery, you need to give a small knot on the back to finish off the point.
To start another thread color embroidery make the same initial procedure. Cut about two meters from the desired line and passse to the needle ending with a tight double knot. Begin to fill in the other pieces chosen by you. Insert the needle through the back of the embroidery and start working. Always start and end at the boundary of the risk (drawing). Do not forget to leave points very close to each other.
Below the view from the back of the embroidery. Do the same with all the other parts you choose. Choose different and beautiful that values ​​the work done colors.
 Read clear:http://www.turehearted.com/news/news120.html

Tips for Successful Paint by the Numbers

The brush supplied is different size, to enable you to paint the smallest shapes in the painting. It can make painting larger shapes very tedious so, bigger brush use this too.

paint by numbers


Start with either the darkest color and end with the lightest or the other way around, leaving any segments that have a mixed color (double number) till last. The reason I recommend doing the colors in sequence from dark to light (or the other way around) is that this helps you learn a little about the tone and chroma of colors.

The contrast between the white (light tone) of the canvas and the darkest color will be very stark. As you add each subsequent color, you'll see how they impact on one another, influencing the way each looks.
paint by numbers
Keep a jar of clean water for washing your brush (assuming it's an acrylic Paint by Numbers kit) to hand, as well as a cloth for wiping and drying the brush. Don't dunk the brush into the paint all the way up to the ferrule, just the tip. Rather pick up paint more frequently than have a glob of it fall off onto the painting.

Be patient! Don't splay out the hairs of the brush in an attempt to paint in an area more quickly. This will quickly ruin the brush and destroy the fine tip. Apply gentle pressure to bend the tips of the hairs slightly and glide the brush along the surface. Think of it as the paper (or canvas) pulling the paint off the brush rather than using the brush to push the paint down.
Read more:http://www.turehearted.com/news/news119.html

2014年9月10日星期三

Diy craft origami butterfly

The butterfly as a symbol of beautiful creature has been a lot of kids and girls love, especially a pair of wings is greatly iconic beauty. We love the diy craft, anf how can not personally folded out such a drift of butterflies. Families with children, then fit together more hands-on production, and have fun while learning with the ability to also recognize the hand of small animals.
Diy craft

As long as a square piece of paper on it, because the beauty of butterflies and gorgeous, it is recommended that you choose to use colored paper to make it easier for such an effect. You can make lots together, so get a bunch of colorful butterflies, also you can folded after a single color of butterfly, with a brush on the wings of a butterfly painted on your favorite pattern, to know the butterfly wings are with a lot of bright and beautiful patterns.
 read more:http://www.turehearted.com/news/news117.html

How to Paint a Color by Number

Color by number became popular in the 1950s. The color by number system allowed non-artist types or individuals who had little painting experience, to create paintings without formal training. This popular pastime is still popular today. The concept involves a drawing divided into numbered sections. Each number correlates with a specific color. Color by number paint kits come with brushes, paint and a color by number paint canvas. The paints used are either oil or water-based.

1.Find all of the places marked "1" on the canvas board.

2.Look at the numbered paint container and find the color marked "1."

3.Open the container and pigment pushed plastic cups.

4.Dip the paintbrush into the paint and paint all spaces marked "1."

5.Clean the brush with turpentine if oil-based paint was used. Use water if water-based paint was used. Close the cap on the paint color marked "1." Wipe excess turpentine off the brush with a paper towel.

6.Repeat this process for all of the numbers on the canvas board until the painting is completed.
Read more:http://www.turehearted.com/news/news118.html

2014年9月9日星期二

How to Paint by Number More Beautiful

Paint by number is an easy way to get involved in art, or to practice painting. Beginners find the guided instructions useful, and the easy-to-follow color-coded numbering system allows anyone to paint with sophistication, regardless of their skill level. To make the end result look more like a realistic original painting, or to camouflage the paint-by-number guidelines, there are a few tricks to employ.

paint by number

1.Work with the right tools. Have various brushes on hand in a variety of sizes, especially a small brush, which will help you to focus on the details. Use acrylic to produce a professional result. Blend your own paint, or have a variety of shades to work with to make your painting more original.

2.Blend the edges of each section so that no white space is showing. Blend similar colors in backgrounds or areas of the painting that do not require definition, such as foliage in landscapes or areas of skin in a portrait. Allow colors in landscapes, backgrounds or large areas to overlap. Begin using light layers, so that guidelines show through, and slowly add more color to produce contrast.
paint by number

3.Apply a second layer of paint. Go back over areas of background, such as a blue sky, adding lighter and darker shades of the same color. This adds dimension, and allows you to be creative while still producing a great end result. Look for areas that need more definition and carefully define edges, borders and details.

4.Allow for editing and drafts. Revisit the painting at a later time to edit as needed with a fresh perspective. Spray an artist's finishing spray to set the paint and allow it to dry completely before framing. Sign your name on the back using permanent marker, or on one of the bottom corners using paint.
READ MORE :http://www.turehearted.com/news/news116.html

2014年9月5日星期五

Diy Paint by Number Crafts

Paint by number crafts first came about in the 1950s. They were looked on both favorably and unfavorably because some felt they took away from people's creativity. Others liked them because they made it possible for every man to be a Leonardo da Vinci. These projects break down paintings into sections, and each section correlates with a specific color. You then paint the picture according to the section numbers.

Paintings
These projects allow you to paint traditional paintings by using numbers. They can be as elementary or as professional as you want. Each paint kit will have many colors so that the picture will blend together.
Custom-Made
Use a favorite picture to create a custom-made paint by number picture. This is a good gift option for someone you care about. When done correctly, no one will be able to tell that it was a paint by number picture and not your own creation. These will often be more difficult because the colors will need to blend.
Read more:http://www.turehearted.com/news/news115.html

2014年9月4日星期四

Paint by Numbers Instructions

Paint by number became a popular hobby in the 1950's. Manufacturers experimented with abstract designs, but research showed people preferred landscapes, animals, children, historical figures. Today manufacturers offer kits easy enough for children to do, to advanced portraits for adult to tackle. Some supplemental tools and techniques can turn your paint by number into a masterpiece good enough to hang.


1.Choose a paint-by-number kit that fits your skill level. More color variations in the picture and the need to mix colors make the project more difficult. Acrylic and watercolor paints are easier to work with than oil paint.

2.Cover your work area with newspapers, or an old sheet. Arrange your painting where there is ample light. Set out your brushes, paint pots and a cup half full with water. Have paper towels and rags handy. Wear old clothes and roll up your sleeves.

3.Read the instructions enclosed with your kit to get a general idea of how to proceed. Study the finished picture on the box and the numbers on your canvas or board to decide where to start. It is not necessarily wise to paint in numbered order. Generally, smaller areas should be painted first.

4.Open only the first paint you will be using. Stir the paint completely with the popsicle stick, scraping the bottom of the pot to reach any pigment that may have settled. Scrape both sides of the stick against the paint pot to collect excess paint. Some kits give you just enough paint to complete the picture, and you don't want to run out of a color.

5.Paint all areas numbered with the color you have chosen. Allow the paint to dry completely. Acrylic and watercolor paints dry fairly quickly; oils take more time to dry.

6.Wash your brush after painting with each color. Wipe the brush on a paper towel to remove excess water and paint. Change the water frequently to keep your colors pure. If you wash your brush thoroughly after painting each color, you can reuse the brush for different colors.

7.Continue painting each color, washing and wiping your brush each time and allowing the color to dry. It is best to paint with each individual color before you mix colors. Follow the directions in your kit if you are mixing colors to see how many parts of each paint color to use.

8.Enhance your painting with these techniques. Apply a wash by diluting a color until it is almost clear and painting it over another area. The wash should be transparent enough to see through it to the paint underneath. Try drybrushing to blur the edges between two areas. Dip your brush into the lighter color and wipe the brush on a rag until the brush is almost dry. Place your brush at the edge of the darker color and blend from light to dark areas. Add details all over with a small paintbrush, marker or colored pencil -- shadows, windowpanes, veins on leaves -- to add more realism to your painting.
Read more:http://www.turehearted.com/news/news113.html

2014年9月3日星期三

Tips on Diy Painting by Number kits

Diy painting by number kits can be an extremely enjoyable and rewarding process, but all of the numbers and paints can place pretty intimidating at first. With the correct tips and tricks, you can diy painting by number kits with ease and be able to admire your beautiful piece of artwork.
painting by number 
Preparation
Before you even begin painting, there are some things you can do to make your experience faster and more enjoyable. Make sure the subject is one that you will enjoy painting, as you will be more motivated to finish it. Clear a flat surface and cover it with something to protect it. This will make your clean-up process a lot faster than scrubbing a table. Wear an apron or old shirt, as painting can get messy and you don't want to ruin your favorite clothing. Fill a plastic cup with water to clean your brush, and have some rags or paper towels handy. Before you even place your paintbrush to the canvas, make sure you read all of the directions listed in the kit thoroughly.
painting by number
Painting
When you begin painting, paint every single number associated with the specific color you are using--don't swap between colors. If you have to keep switching back to a color you didn't finish, it will make the process much longer and more frustrating. When switching to a new color, make sure your brush is clean so that you don't mix colors by mistake. It is much easier if you paint the smallest areas first, so that you don't cover them when painting the other larger areas. Allow the diy painting by number kits to dry thoroughly before you display your work of art.